| Caramel Puff Corn | ||
 | ||
 Prep Time: 10 minutes Cook Time: 45 minutes Chill Time: 30 minutes Yield: 5 quarts
|
| |
Thursday, November 10, 2011
Cracked out corn
Ok...my dear friend Mandi raves of this recipe and I am pumped to make it! She had it and went home and made it, lol. I love her.
Wednesday, November 9, 2011
Pumpkin Spice Cereral Treats

If there is one thing in the whole wide world I love, it's fall. And one of the best things about fall is pumpkin. You have complete license to add pumpkin to anything and everything this season, and no one thinks you are nuts. I fully support this, and to contribute to the madness I made these.
First, I didn't use "puffed rice cereal" because I have a Costco size box of Cinnamon Cheerios that the daughter decided she doesn't like (which is nuts, because that stuff is amazing; it does mean more for me, and I'm totally fine with that.). And when you have enough cereal to feed an army and only two adults, you need to make sacrifices. Like mixing them up with pumpkin and marshmallows.
- 1.5x the recipe; the bars were thinner than I would have liked. I did use a 9x13 pan, and the author of this recipe used 8x11 (where do you get such a thing) so I understand why mine weren't as tall.
- Perhaps try it out with Golden Grahams, as that would also be tasty. But that would be on the third time I make it, not the next time.

- I used parchment paper instead of buttering the pan, in an effort to justify eating more treats later on. It worked pretty well. (see amazing photo to left)
- I used Cinnamon Cheerios, and I'd try it with the Rice Krispies next time to see if there is a big difference.
- Because life is short, and browned butter is delicious, I browned the butter for a deeper, nuttier flavor.
serves 12
3 tablespoons unsalted butter 1/4 cup canned pumpkin puree
1 (10 ounce) bag mini marshmallows plus one cup
1/4 teaspoon pure vanilla extract
1/4 teaspoon ground cinnamon
Pinch of allspice
Pinch of freshly grated nutmeg
Pinch of kosher salt
6 cups puffed rice cereal
Butter a 9x13-inch baking dish (or a smaller dish — see Note below).
In a heavy saucepan or Dutch oven, melt butter over medium-low heat. Add the pumpkin puree and continue to cook until it is warmed through. Fold in 10 ounces of the marshmallows, stirring frequently until almost completely melted. Stir in vanilla, cinnamon, allspice, nutmeg, and salt, and remove from heat.
Allow the marshmallow mixture to cool 10 minutes; fold in the remaining cup of marshmallows. Continue to cool the mixture for another 20 to 25 minutes until it is room temperature (failure to cool the mixture will result in soggy rice crispy treats.) Add the puffed rice cereal and stir, using a silicone spatula, until combined.
Press the mixture into the greased rectangular baking dish. Let set for 30 minutes before cutting and serving.
• Note: I call for a 9x13-inch dish here, but I often use an 8x11-inch because I like taller treats. Any size in this range should do.
Recipe found Apartment Therapy's Kitchn
Saturday, November 5, 2011
Chicken, Pesto & Veggie Pasta
 So I have no clue what to "name" this. I had been wanting a pasta with a pesto sauce so I just threw some veggies and chicken together. Toward the end I figured a pure pesto sauce might be a bit too rich of a taste (for my one year old) so I ended up making a pesto cream sauce. The meal took about 40 minutes total to prep and cook. I expected it to take a bit longer - I was pleasantly surprised. This recipe makes a lot. I realized it was going to make quite a bit once I got started, but just went with it because we love having leftovers. Thankfully so because my daughter absolutely loved it and ate her whole bowl. I love when that happens - it's rare.
 Chicken, Pesto & Veggie Pasta
2 tbs. EVOO
2 chicken breasts, diced
1/2 yellow onion, diced
1 bunch asparagus, chopped
1 14 oz. can artichokes, chopped
4 oz. sun dried tomatoes, julienne sliced
3 oz. black olives, sliced
Sauce
3 tbs. butter
2 tbs. flour
2 cups heavy whipping cream
1 cup Parmesan cheese
6 oz. jar pesto
1 package Trader Joe's Vegetable Radiatore
Saute the chicken and onion in the EVOO. Add preferred seasoning to taste (I used garlic powder, onion powder, salt and pepper - kept it simple, would have preferred fresh garlic, but was hurrying). Once chicken is cooked, add in asparagus, artichoke, sun dried tomatoes, and olives. Let simmer.
In a saucepan, melt butter and then add flour. Once blended, add the heavy whipping cream. Stir until warm. Add Parmesan cheese. Once the Parmesan cheese is melted whisk in pesto.
Add pasta to boiling water.
You could toss everything together, I chose not to. This makes way more sauce than is necessary for the amount of chicken, veggies & pasta. Even after storing the leftovers in the fridge, I still had plenty of sauce left to freeze.
We loved it - hopefully you will too!
Monday, October 31, 2011
Chewy Chocolate Cookies
I love Cooks Illustrated. I love that when I make one of their recipes I know that they are pretty much fool proof. I know it will be worth my time and effort. They stuck behind their promise with these yummy chewy chocolate cookies! I have to say, they were pretty easy. Not a one bowl recipe, but 3 bowls. But they look amazing.


CHEWY CHOCOLATE COOKIES
Published January 1, 2009. From Cook's Illustrated.
WHY THIS RECIPE WORKS:
We wanted an exceptionally rich chocolate cookie recipe with a sturdy, not crumbly, texture. The fat in melted chocolate made our dough too soft, so we replaced the chocolate with cocoa powder. Eliminating egg yolks further improved the struct...(more)
MAKES 16 COOKIES
We recommend using the test kitchen’s favorite baking chocolate, Callebaut Intense Dark L-60-40NV, but any high- quality dark, bittersweet, or semisweet chocolate will work. Light brown sugar can be substituted for the dark, as can light corn syrup for the dark, but with some sacrifice in flavor. A spring-loaded ice cream scoop (size #30) can be used to portion the dough.
INGREDIENTS
- 1/3cup even more sugar granulated sugar (about 2 1/2 ounces), plus 1/2 cup for coating
- 1 1/2cups unbleached all-purpose flour (7 1/2 ounces)
- 3/4cup Dutch-processed cocoa powder
- 1/2teaspoon baking soda
- 1/4teaspoon table salt plus 1/8 teaspoon table salt
- 1/2cup dark corn syrup (see note)
- 1large egg white
- 1teaspoon vanilla extract
- 12tablespoons (1 1/2 sticks) unsalted butter , softened (70 degrees)
- 1/3cup packed dark brown sugar (about 2 1/2 ounces, see note)
- 4ounces bittersweet chocolate , chopped into 1/2-inch pieces (see note)
INSTRUCTIONS
- 1. Adjust oven racks to upper- and lower-middle positions and heat oven to 375 degrees. Line 2 large (18- by 12-inch) baking sheets with parchment paper. Place ½ cup granulated sugar in shallow baking dish or pie plate. Whisk flour, cocoa powder, baking soda, and salt together in medium bowl. Whisk corn syrup, egg white, and vanilla together in small bowl.
- 2. In stand mixer fitted with paddle attachment, beat butter, brown sugar, and remaining 1/3 cup granulated sugar at medium-high speed until light and fluffy, about 2 minutes. Reduce speed to medium-low, add corn syrup mixture, and beat until fully incorporated, about 20 seconds, scraping bowl once with rubber spatula. With mixer running at low speed, add flour mixture and chopped chocolate; mix until just incorporated, about 30 seconds, scraping bowl once. Give dough final stir with rubber spatula to ensure that no pockets of flour remain at bottom. Chill dough 30 minutes to firm slightly(do not chill longer than 30 minutes).
- 3. Divide dough into 16 equal portions; roll between hands into balls about 11/2 inches in diameter. Working in batches, drop 8 dough balls into baking dish with sugar and toss to coat. Set dough balls on prepared baking sheet, spacing about 2 inches apart; repeat with second batch of 8. Bake, reversing position of the baking sheets halfway through baking (from top to bottom and front to back), until cookies are puffed and cracked and edges have begun to set but centers are still soft (cookies will look raw between cracks and seem underdone), 10 to 11 minutes. Do not overbake.
- 4. Cool cookies on baking sheet 5 minutes, then use wide metal spatula to transfer cookies to wire rack; cool cookies to room temperature.
Saturday, October 29, 2011
Pad Thai
This is from my favorite, Americas Test Kitchen Healthy Family Cookbook. This was for my hubby and he loved it. He said he would have liked a pinch more spice. Even my 2 and a half year old ate her bowl of this all gone! I did prep everything in bowls before cooking with you really have to do for this one. I should have gotten the 4 quarts of water boiling and the rice noodles cooking while I prepped. Once you are done prepping this recipe went SO fast. Hope you try it.

Pad Thai
Serves 4
Sauce
2 Tbsp tamarind paste or tamarind substitute
3/4 c boiling water (boil, then measure)
3 Tbsp fish sauce
3 Tbsp sugar
1 Tbsp canola oil
1 Tbsp rice vinegar
1/4 tsp cayenne pepper
Noodles, Shrimp, and Garnish
8 oz (1/4 inch wide) dried flat rice noodles
1 Tbsp canola oil
12 oz medium shrimp (40-50 per pound) peeled and deveined - I bought what was on sale
1 shallot, minced
3 garlic cloves, minced
2 large eggs, lightly beaten
6 oz bean sprouts (about 3 cups)
4 scallions, sliced on the bias
salt
1/4 c minced fresh cilantro
2 Tbsp chopped, roasted, unsalted peanuts
lime wedges (for serving)
1. For the sauce: Soak the tamarind paste in the boiling water until softened, about 10 min. Push the mixture through a fine mesh strainer into a bowl, removing the seeds and fibers and extracting as much pulp as possible. Whisk the fish sauce, sugar, oil, vinegar, and cayenne into the tamarind liquid. (Discard the strained seeds and fibers)
2. For the noodles, shrimp and garnish:
Bring 4 quarts of water to a boil in a large pot. Off the heat, add the noodles and let stand, stirring occasionally, until softened but not fully cooked, about 10 min. Drain the noodles and leave them in the colander.
3. Heat 1 1/2 tsp of the oil in a 12 inch nonstick skillet over high heat until just smoking. Add the shrimp and cook, stirring occasionally, until the shrimp are pink, curled, and browned around the edges, about 3 min. Transfer to a bowl.
4. Add the remaining 1 1/2 tsp oil to the skillet and return to medium heat until shimmering. Add the shallot and garlic and cook until lightly browned, about 1 1/2 min. Stir in the eggs and cook, stirring constantly, until scrambled but still moist, about 20 seconds.
5. Add the softened noodles and sauce, increase the heat to high, and cook, tossing gently, until the noodles are evenly coated, about 1 min.
6. Add the cooked shrimp, sprouts, and scallions to the skillet and cook, tossing gently, until the shrimp are heated through and the noodles are tender, about 2 min. Season with salt to taste and sprinkle with the cilantro and peanuts. Serve with lime wedges.
Thai Chicken Tacos
This is a recipe from my sweet friend Alicia. I believe she said the make this almost every week?!? I can see why. This is such a pretty dish. We are having it for dinner tonight so we have the chicken marinating and the cabbage slaw chillin in the refrigerator. It all looks so great. Can't wait. We doubled this bad boy for us so we could eat for several meals from this.

Thai Chicken Tacos
Serves 4 (2 taco) servings
Tacos
1 lime, halved
1 lb. skinless, boneless chicken breasts or tenders, cut into 1/2-3/4 inch pieces
1/4 cup chopped fresh cilantro
1 large shallot (didn't have any, so I did a 1/4 red onion & 2 more garlic cloves)
3 cloves garlic, minced
1 Tbsp fish sauce
2 tsp reduced sodium soy sauce
1/2 to 1 tsp crushed red pepper
1/2 to 1 tsp hot chili sauce (such as Sriracha)
2 Tbsp vegetable oil
16 corn tortillas, heated
Cabbage Slaw (put this all in a bowl & toss)
2 cups shredded Napa cabbage
1/2 c shredded carrot
1/2 c sliced green onions
1/3 c sliced radishes
1/4 c chopped fresh cilantro
1/4 coarsely chopped peanuts
1/4 c rice vinegar
1. Juice one lime half (about 1 Tbsp.); cut remaining half in wedges. In bowl stir together chicken, cilantro, shallot, garlic, the 1 Tbsp. lime juice (added all the juice because my chicken was a little over a pound), fish sauce, soy sauce, pepper, and chili sauce. Cover; refrigerate 1 hour (I am going to leave it all day). In large skillet cook chicken mixture in hot oil over medium-high heat 5 min or until chicken is cooked, stirring occasionally.
2. To serve, layer two tortillas. Top with chicken and cabbage slaw. Serve with remaining slaw and lime wedges.
This recipe is from Better Homes and Gardens June 2011
Friday, October 28, 2011
Arugula, Beet, and Goat-cheese salad
This recipe is from the Everday Foods, Great Food Fast cookbook. My husband loved it, so I thought I had to post it. He said he wished I had made the goat cheese disks smaller, bite size. For the beets you can use canned beets or roast the beets. I roasted the beets two days ago (because I bought the beets, then looked for a recipe), earlier today I did the goat cheese and marinated the beets...I think you could totally do this as a make ahead dish. Also we ate this as the main dish, so it served 2, lol.

Arugula, beet, and goat-cheese salad
Serves 4 - Prep time: 20 min - Total time: 20 min
1/2 walnuts
1 Tbsp finely chopped shallot
2 Tbsp red wine vinegar
2 Tbsp fresh orange juice (I used it from a carton, sorry)
3 Tbsp olive oil (I did just over 2T)
Coarse salt & fresh ground pepper
1 can (15 ounces) whole beets, drained, and sliced into 1/2 inch wedges
6oz soft goat cheese, at room temperature (used 4oz)
8 ounces (one bunch) arugula, stemmed and washed well (I did 6oz)
2oz frisee (4 cups) (I did 2 cups)
Roasting the beets:
wrap about 1lbs (5 small) well scrubbed beets in 2-3 packets of foil
place on a baking sheet, and bake in a preheated 450 degree oven until the beets are slightly soft to the touch
45 min - 1 hour depending on their size, cool the beet in the packets, then rub off the skins (I used rubber gloves for this part)
1. Scatter the walnuts on a baking sheet; toast in a 350 degree oven, tossing once, until golden brown and fragrant, about 10 min. (when I did this my walnuts were almost burned at 8) Let cool, then finely chop and place in a shallow dish.
2. In a small bowl, whisk together the shallot, vinegar, orange juice, and oil; season with salt & pepper. Place the beets in a small bowl. Pour one third of the dressing over the beets; toss to coat.
3. With your hands, form the goat cheese into 12 equal balls. Roll the balls one at a time in the walnuts, turning to coat completely, then gently press with fingers to flatten into disks.
4. Place the arugula in a large bowl. Tear the frisee into large pieces, and add to the bowl. Drizzle the greens with the remaining dressing, and toss to combine. Divide among 4 plates, and top each serving with some of the sliced beets and 3 goat-cheese disks.
Beef Braised with Red Wine
This stew is thick (although some times I add more liquid at the end), warm, delicious, and NOT light. This is from the PBS show Everyday Foods. I have to say this is one of my favorite fall dishes. This is my third year of using this recipe and I still love it. We had it with a salad tonight, but other times we have served it with a yummy fresh bread and butter, or polenta. I know that sounds weird but it taste so good. Don't hate. ;O)


|
| |||||||||||||||

Monday, October 10, 2011
Spinach Artichoke Dip

This recipe is honestly ridiculously easy. I couldn't quite pin what I felt was "missing" from the recipe, but maybe you can figure it out by looking at the ingredients. My sister & husband absolutely loved it. Perhaps I just have a picky pallet lately. There is nothing healthy about this one, folks! It's a dish you just turn away and ignore the ingredients!
1/2 of a 10 ounce package of frozen, chopped spinach (drained)
14 oz can artichoke hearts (drained, coarsely chopped)
4 oz cream cheese
1/2 c sour cream
1/4 c mayonnaise
1 clove garlic, grated
1/2 teaspoon chile sauce (optional)
1/4 c parmigiano reggiano, grated
1/4 c mozzarella, grated
Preheat oven to 350 F. Mix everything and pour into a baking dish. Bake until bubbling and golden brown on top, about 20-40 minutes.
My alterations... I forgot to add the chile sauce - Oops! As far as the mozzarella goes...my sister and I decided 1/4 cup was definitely not enough. I think we ended up adding almost a cup total and to be quite honest...next time I'd probably add more. Definitely could use a dash of salt, wish I would have added that. I baked mine for about 25-30 minutes. I stirred it about halfway to help it cook through - we were hungry! Then put the broiler on for the last 5 minutes to "help" it brown on top. It smelled too yummy...we were impatient. You could dip a zillion things in this cheesy goodness - we went for tortilla chips and a baguette because we had them at home. Carbalicious!
Sunday, October 9, 2011
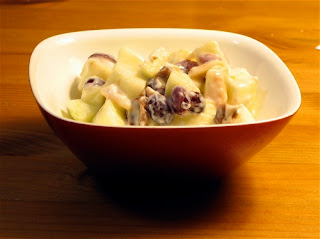
Autumn Apple Salad
My sister sent me this blog that about cheap, healthy, good food. Well, I was looking for some kind of snack that I had everything already in my pantry...and this is what I stumbled upon. Now if you don't have these things, you can get them in the bulk section for SUPER cheap or use some other things you have in the house! It may not look like much, but it was really good. Also, I would like to plug my favorite yogurt that we used in this. It was Greek Gods vanilla honey greek yogurt. It taste like a custard. It is amazing. I recommend their other flavors too! I might bring this to the next thing I need to bring a dish to that is in the morning! Hope you love it as much as I did.
Autumn Apple Salad
Makes about 4.5 cups of salad, or 6 servings of ¾ cups each
Adapted from All Recipes.
 4 tart green apples
1/4 cup toasted blanched slivered almonds
1/4 cup dried cranberries
1/4 cup chopped dried cherries
1 (8 ounce) container light vanilla yogurt
1) In a medium bowl, combine all ingredients. Stir until thoroughly mixed and apples are coated.
Cuatro Leches Cake

This week I have not been feeling well and wanted some comfort food. Well, I HAD to make this once I saw this recipe. The only problem was that I was exhausted (from not feeling well) by the time I was done baking the cake...and I was hungry. So we simply ate the cake (never made it to the glaze or frosting). I have to tell you...it was amazing. I am dying to try this again and finish the recipe. I love Sara Kate's blog. She always has the most beautiful and tasty recipes. She has a Harvest Cake with goat cheese frosting that I am looking forward to making this fall too! The blog also features these really creative kitchen setups in small spaces. You will have to check it out some time.
Cuatro Leches Cake
makes one double-layer 9-inch cake
makes one double-layer 9-inch cake
For the cake:
1 1/2 cups cake flour
1 1/2 teaspoons baking powder
1/2 teaspoon salt
1/2 cup unsalted butter, room temperature
1 cup sugar, divided
4 large eggs, separated
1/3 cup evaporated milk
1 teaspoon pure vanilla extract
1 1/2 cups cake flour
1 1/2 teaspoons baking powder
1/2 teaspoon salt
1/2 cup unsalted butter, room temperature
1 cup sugar, divided
4 large eggs, separated
1/3 cup evaporated milk
1 teaspoon pure vanilla extract
For the leche glaze:
1 cup coconut mlk
1/2 cup sweetened condensed milk
1/4 cup evaporated milk
1/4 cup heavy cream
1 teaspoon pure vanilla extract
1 cup coconut mlk
1/2 cup sweetened condensed milk
1/4 cup evaporated milk
1/4 cup heavy cream
1 teaspoon pure vanilla extract
For the topping:
2 cups heavy cream
1/3 cup powdered sugar
1 teaspoon pure vanilla extract
1 fresh coconut, flesh removed and shredded, about 1 cup
2 cups heavy cream
1/3 cup powdered sugar
1 teaspoon pure vanilla extract
1 fresh coconut, flesh removed and shredded, about 1 cup
Preheat oven to 350° F.
Grease and flour a 9-inch x 2-inch round cake pan and line with a circle of parchment paper.
In a medium mixing bowl, whisk together the cake flour, baking powder and salt. Set aside.
Using either a stand mixer, electric mixer, or a wooden spoon, cream the butter and 3/4 cup of the sugar. Beat in the egg yolks until mixture is uniform in texture and pale yellow. Stir in the evaporated milk and vanilla until well-combined.
In another clean, dry bowl (if using a stand mixer you will need to use a clean bowl or transfer the egg mixture to a separate large mixing bowl) beat the egg whites to soft peaks. Gradually add the remaining 1/4 cup sugar and beat until glossy and stiff.
Fold in one third of the egg white mixture into the egg yolk mixture, then fold in one third of the dry mixture. Alternate in this manner until the ingredients are combined.
Transfer the mixture to the prepared baking pan. Bake 35-45 minutes, until the top is golden brown and the cake springs back when touched lightly across the middle. Remove from oven and cool 10 minutes on a cooling rack then remove the cake from the pan and allow to cool completely.
Meanwhile, while the cake is baking, prepare the leche glaze. Combine all the ingredients in a saucepan and heat over medium until bubbling, stirring constantly. Remove the glaze from the heat and allow to cool slightly.
When the cake is cooled completely, slice it horizontally into 2 even layers. Place each layer on a large plate and spoon the leche sauce evenly over the cake layers, 1/4 cup at a time, waiting about 5 minutes between pours to allow the cake to absorb the glaze. Cover and refrigerate for at least 4 hours, or overnight if possible.
When layers are chilled, prepare the topping. In a small mixing bowl, beat the cream, sugar, and vanilla extract until stiff peaks form.
Assemble the cake by carefully peeling each layer off their respective plates. Place three strips of parchment in a triangle on a cake platter. The triangle should be large enough for the cake to rest on top without sections of the plate showing between the cake and the parchment. Place the original bottom layer, cut side up, on a cake platter. Using an offset spatula or a wide knife, spread a thin layer of the topping across the cut side. Then dump about a cup of topping in the middle and spread evenly across the top right up to the sides. Carefully place the second layer, cut side down, on top and top the rest of the cake with the remaining topping, pushing the cream across the top and down the sides.
Decorate the tops and or side of the cake with the shaved coconut, pressing it carefully into the topping.
Carefully pull away the parchment strips, leaving a clean plate.
 Our cake and my helper.
Indoor Pulled Pork with Sweet and tangy BBQ Sauce
This is from America's Test Kitchen. It is one of my favorite cooking shows. They made this yummy smoked pork for sandwhiches inside. We have made it twice since we saw the show and it is awesome! This recipe takes all day...but it is totally worth it! Serve it on a bun with bread and butter pickles and some slaw.

Halving the pork increases its surface area, which creates more flavorful bark.


INDOOR PULLED PORK WITH SWEET AND TANGY BARBECUE SAUCE
Serves 6 to 8. Published January 1, 2010. From Cook's Illustrated.
Sweet paprika may be substituted for smoked paprika. Covering the pork with parchment and then foil prevents the acidic mustard from eating holes in the foil. Serve the pork on hamburger rolls with pickle chips and thinly sliced onion. Lexington Vinegar Barbecue Sauce or South Carolina Mustard Barbecue Sauce (see related recipes) can be substituted for the Sweet and Tangy Barbecue Sauce. Alternatively, use 2 cups of your favorite barbecue sauce thinned with ½ cup of the defatted pork cooking liquid in step 5. The shredded and sauced pork can be cooled, tightly covered, and refrigerated for up to 2 days. Reheat it gently before serving.
INGREDIENTS
- Pork
- 1cup plus 2 teaspoons table salt
- 1/2cup plus 2 tablespoons sugar
- 3tablespoons plus 2 teaspoons liquid smoke
- 1boneless pork butt (about 5 pounds), cut in half horizontally (see step by step below)
- 1/4cup yellow mustard
- 2tablespoons ground black pepper
- 2tablespoons smoked paprika (see note)
- 1teaspoon cayenne pepper
- Sweet and Tangy Barbecue Sauce
- 1 1/2cups ketchup
- 1/4cup light or mild molasses
- 2tablespoons Worcestershire sauce
- 1tablespoon hot sauce
- 1/2teaspoon table salt
- 1/2teaspoon ground black pepper
INSTRUCTIONS
- 1. FOR THE PORK: Dissolve 1 cup salt, 1/2 cup sugar, and 3 tablespoons liquid smoke in 4 quarts cold water in large container. Submerge pork in brine, cover with plastic wrap, and refrigerate for 2 hours.
- 2. While pork brines, combine mustard and remaining 2 teaspoons liquid smoke in small bowl; set aside. Combine black pepper, paprika, remaining 2 tablespoons sugar, remaining 2 teaspoons salt, and cayenne in second small bowl; set aside. Adjust oven rack to lower-middle position and heat oven to 325 degrees.
- 3. Remove pork from brine and dry thoroughly with paper towels. Rub mustard mixture over entire surface of each piece of pork. Sprinkle entire surface of each piece with spice mixture. Place pork on wire rack set inside foil-lined rimmed baking sheet. Place piece of parchment paper over pork, then cover with sheet of aluminum foil, sealing edges to prevent moisture from escaping. Roast pork for 3 hours.
- 4. Remove pork from oven; remove and discard foil and parchment. Carefully pour off liquid in bottom of baking sheet into fat separator and reserve for sauce. Return pork to oven and cook, uncovered, until well browned, tender, and internal temperature registers 200 degrees on instant-read thermometer, about 1½ hours. Transfer pork to serving dish, tent loosely with foil, and let rest for 20 minutes.
- 5. FOR THE SAUCE: While pork rests, pour 1/2 cup of defatted cooking liquid from fat separator into medium bowl; whisk in sauce ingredients.
- 6. TO SERVE: Using 2 forks, shred pork into bite-sized pieces. Toss with 1 cup sauce and season with salt and pepper. Serve, passing remaining sauce separately.
TECHNIQUE
Cutting Pork Butt in Half
Halving the pork increases its surface area, which creates more flavorful bark.
Holding your knife parallel to the cutting board, press one hand flat against the top of the pork butt while cutting horizontally.
STEP-BY-STEP
Adding Smoke Flavor (Without a Fire)
1. SOAK IN SMOKE
Adding liquid smoke to brine draws smoky flavor deep into meat.
2. RUB WITH SMOKE
Rubbing pork with more liquid smoke gives bark pronounced smoky flavor.
3. SPICE IT UP
Adding smoked paprika to dry rub brings additional smokiness and helps bark develop its color.
Shredded Brussels Sprouts with Walnuts

This is from November 2011 Rachel Ray Magazine. I was so excited because it separated the side dishes for Thanksgiving by COLOR! Brilliant. This was SUPER easy and tasted awesome.
Serves: 8, not sure how that could be true, but ok.
Prep: 10, It probably took me 13
Cook: 20, this sounds about right
1 cup coarsely broken walnuts (about 4oz)
1 1/2 lbs Brussels sprouts (I did one bag from the grocery store)
1/4 cup EVOO
2 cloves garlic, thinly sliced
salt/pepper
**ok, I used about 3T of EVOO, 1tsp of brown sugar, ran out of pepper so I used a few shakes of cayenne, and squirted some lemon juice on it at the end.
**Also, I may serve with grated parmesan on top. I thought about adding dried cranberries for color in this dish. I definitely think it would work.
1. Position a rack in the center of the oven and preheat to 350. Spread the walnuts on a small baking sheet and bake until toasted, about 10 min. Let cool.
2. Meanwhile, using a food processor fitted with the slicing disc, shred the brussels sprouts (or half them lenghtwise and shred crosswise with a very sharp knife)
3. In a large skillet, heat the EVOO over medium heat. Add the garlic and cook, stirring occasionally, until golden, about 2 min. Add the brussels sprouts, 3/4tsp salt and 1/4tsp. pepper and cook, tossing well, until crisp-tender, about 5 min. Stir in the toasted walnuts and spoon into a serving bowl.
Love this dish!
Easy Affordable Chicken Tortilla Soup
Ok...my version of the tortilla soup..I just threw it into the crockpot and let it simmer for 2 hours. (she said this is the recipe is halved, so double it up if you want and put some in a gallon ziplock for a rainy day).
1 can each of-
Cream of celery soup
Cream of mushrom
Cream of chicken
Nacho cheese soup
2 cans of rotel tomatoes with green chilis
4 chicken breasts (for ease, I used canned chicken)
1 teaspoon of red chili powder
1 onion
1/2 tsp of garlic
15oz of chicken broth
After it simmers, top it with shredded cheese and broken chips or tortilla strips.
Monday, October 3, 2011
Oatmeal Pumpkin Pancakes
 This weekend it was finally cool & breezy enough to officially welcome fall. I was in the mood for oatmeal pumpkin pancakes and tried to find a recipe that I could make as "organic" as possible with what I had in the house that morning. I found this recipe...pretty simple. It was a bit strange to me that the recipe was for a single serving. I quadrupled the recipe so I could freeze the leftovers.
One thing to keep in mind: The batter looks like runny, natural peanut butter. I thought it might have needed a bit more oatmeal (flour) to pull it together, but they turned out great. The family really loved them - there was a texture thing thoguh for me that I just couldn't get over, but they tasted great. I'll definitely make them again!
Oatmeal Pumpkin Pancakes
(keep in mind this receipe yields 1 serving)
(keep in mind this receipe yields 1 serving)
2/3 cups oats
1 egg
1/4 cup pumpkin
1/2 cup almond milk
1/2 teaspoon vanilla extract
1/4 teaspoon baking powder
1/2 teaspoon pumpkin pie spice
1/4 teaspoon cinnamon
2 teaspoons agave
pinch of salt
Directions:
Preheat griddle or pancake pan to medium heat. In a food processor or blender, pulse oatmeal until finely ground (almost flour consistency). Transfer oat flour to a bowl and add remaining ingredients. Whisk to combine. Grease pancake pan and pour batter on pan. Flip after about 90 second until fully cooked.
Preheat griddle or pancake pan to medium heat. In a food processor or blender, pulse oatmeal until finely ground (almost flour consistency). Transfer oat flour to a bowl and add remaining ingredients. Whisk to combine. Grease pancake pan and pour batter on pan. Flip after about 90 second until fully cooked.
I took this recipe from http://www.runningtothekitchen.com/2011/09/oatmeal-pumpkin-pancakes/. The only variation from the orginal was the cinnamon.
Thursday, September 22, 2011
Turkey Kick - Turkey Meatballs and Kale Soup
I will try to remember what I have changed when I made this, but OH MY GOSH we are crazy about this recipe. I made it twice the week I got it. She makes it in a crockpot and I just put it in a big pot.
This recipe is from http://gluten-free-zen.com/2011/04/30/crockpot-turkey-meatball-soup/
MY version of it: Nicole's Stockpot Turkey Meatball Soup
ORIGINAL...


This recipe is from http://gluten-free-zen.com/2011/04/30/crockpot-turkey-meatball-soup/
MY version of it: Nicole's Stockpot Turkey Meatball Soup
1 Packages of Ground Turkey
1 Eggs
1/2 Tbsp. Basil (I did dried)
1/2 Tbsp. Oregano (I did dried)
Small Sprig of Rosemary (fresh)
About 1/4 Cup Parmesan (or more)
1 Tbsp. Chopped Garlic
1 tsp. Sea Salt
1/2 tsp. Pepper
Olive Oil
1 Large Onion
1-3 Heaping Cup of Pre-Shredded Carrots
3 Large Kale Leaves, Stalks Removed & Leafy Parts Chopped (1-2 bunches)
2 Tbsp. Chopped Garlic
2 tsp. Sea Salt
1 tsp. Pepper
About 4 Boxes of low sodium Chicken Broth (add more or less depending on how many people you are feeding and how "brothy" you like it)
Place the ground turkey, eggs, chopped basil,oregano and rosemary, chopped garlic, dairy free parmesan, and 1 tsp. of sea salt and 1/2 tsp. of pepper in a large bowl. Combine all of the ingredients with your hands, being careful not to overwork the mixture. You want all of the ingredients completely combined but not “mushy” and without at least a little texture. Line a baking sheet with parchment paper and form the turkey into about 1 inch balls. I would say it makes between 23-25 (one tray).
Bake in a 400 degree oven until lightly golden. About 15-20 minutes or so. Don’t overcook them as turkey has very little fat and they will become dry.
(I did this step in a LARGE skillet so I could add lots of veggies, as I ran out of room I added them to the broth) While the turkey is baking chop the onion and remaining garlic and saute in olive oil just until the onions begin to turn translucent. Add the chopped carrots and toss for 2 minutes, add the chopped kale and toss for two minutes more. (I just put it in a stock pot of hot broth, simmered for 15 min. ish and then served or cooled and put in fridge) Place meatballs and sautéed ingredients in crock pot, fill with chicken broth, season with remaining salt and pepper and cook on low for 6-8 hours depending on your schedule for the day.
ORIGINAL...
Crockpot Turkey Meatball Soup
2 Packages of Ground Turkey
2 Eggs
1 Tbsp. Basil
1 Tbsp. Oregano
Small Sprig of Rosemary
About 1/4 Cup Dairy-Free Parmesan
1 Tbsp. Chopped Garlic
1 tsp. Sea Salt
1/2 tsp. Pepper
Olive Oil
1 Large Onion
1 Heaping Cup of Pre-Shredded Carrots
3 Large Kale Leaves, Stalks Removed & Leafy Parts Chopped
2 Tbsp. Chopped Garlic
2 tsp. Sea Salt
1 tsp. Pepper
About 4 Boxes of Gluten-Free Chicken Broth
Place the ground turkey, eggs, chopped basil,oregano and rosemary, chopped garlic, dairy free parmesan, and 1 tsp. of sea salt and 1/2 tsp. of pepper in a large bowl. Combine all of the ingredients with your hands, being careful not to overwork the mixture. You want all of the ingredients completely combined but not “mushy” and without at least a little texture. Line a baking sheet with parchment paper and form the turkey into about 1 inch balls. I would say it makes between 45-50 (Almost two trays.)

Bake in a 400 degree oven until lightly golden. About 30 minutes or so. Don’t overcook them as turkey has very little fat and they will become dry.
While the turkey is baking chop the onion and remaining garlic and saute in olive oil just until the onions begin to turn translucent. Add the chopped carrots and toss for 2 minutes, add the chopped kale and toss for two minutes more. Place meatballs and sautéed ingredients in crock pot, fill with chicken broth, season with remaining salt and pepper and cook on low for 6-8 hours depending on your schedule for the day.

This is a full crockpot so I would say that it would serve at least five hungry people with a little left over. I served it in the infamous Pier 1 debacle ramekins and I think the contrast was quite nice.

Subscribe to:
Posts (Atom)